
Google Search Console (GSC) is an SEO tool used to help you monitor, maintain, and optimize your website's organic search presence. It is primarily used to view clicks and impressions but, it also offers a tool that allows you to quickly trigger a crawl of your website by Googlebots.
How to set up a Google Search Console account
Step 1: Sign in to Search Console with your Google account
First, you will want to open https://search.google.com/search-console/welcome in a web browser.
**Note: You will need to have a Google account for this method to work when setting up Search Console; this can include, Google Analytics, Adwords, or Gmail, and you will use the same login credentials. If you don't have an existing Google account, don't worry, you can easily set up a Google account for free.
Step 2: Enter your Website's Domain (or URL-Prefix) to Add a Property
After you sign in, you have the option to add a property type via your domain or via a URL prefix.

We recommend you set up Google Search Console using a domain.
Why do we recommend using a domain? Let's start with some key definitions.
- Property – a catch-all term for a single website, URL, mobile app, or device with a uniroot directory
- Domain – the name of your website (without http(s):// and www.). For example, our domain is: xologic.com
- Subdomain – an extension added to a domain, like www.xologic.com or blog.xologic.com
- URL – an address for a web page. (Domain is the name of a site; URL leads to a page within that site) like xologic.com/content/news/
- URL Prefix – the protocol that appears before your domain. For example, http:// or https://
Setting up Search Console via the “Domain” Option
Using this option sets up your account as a domain-level property. This means you’re creating a single property that includes all subdomains and URL prefixes associated with your domain. In other words, this option connects Google Search Console to every aspect of your site.
To set up Google Search Console with a domain-level property, you will simply enter your site’s Domain in the entry field and click “Continue.”
Setting up Search Console via the “URL-prefix” Option
This means you’re creating a single property for only one URL prefix for your site. As such, Search Console will only be connected to one version of your site – not the whole thing with all protocols/subdomains – and so it may not provide accurate data.
To set up a URL prefix property, you will enter a URL with a URL Prefix in the field, and click “Continue.”
**Note: In order to ensure Search Console provides accurate data with URL-prefix properties, create a GSC property for each of the following four URLs:
- https://yourdomain.com
- http://yourdomain.com
- https://www.yourdomain.com
- http://www.yourdomain.com
If you use other subdomains, like blog.yourdomain.com or shop.yourdomain.com, then you’ll want to create a property for each of those as well. You will have to repeat the entire Google Search Console setup process for each of these URLs.
Step 3: Verify Your Website
To implement Google Search Console and start gathering data, you need to verify that you own your site. The verification process varies depending on which option you chose in the previous step.
Verification Method for a Domain Property
There is only one way to verify a domain-level property, and that’s through your DNS provider (or domain name system provider). Below is the screen you’ll start with.
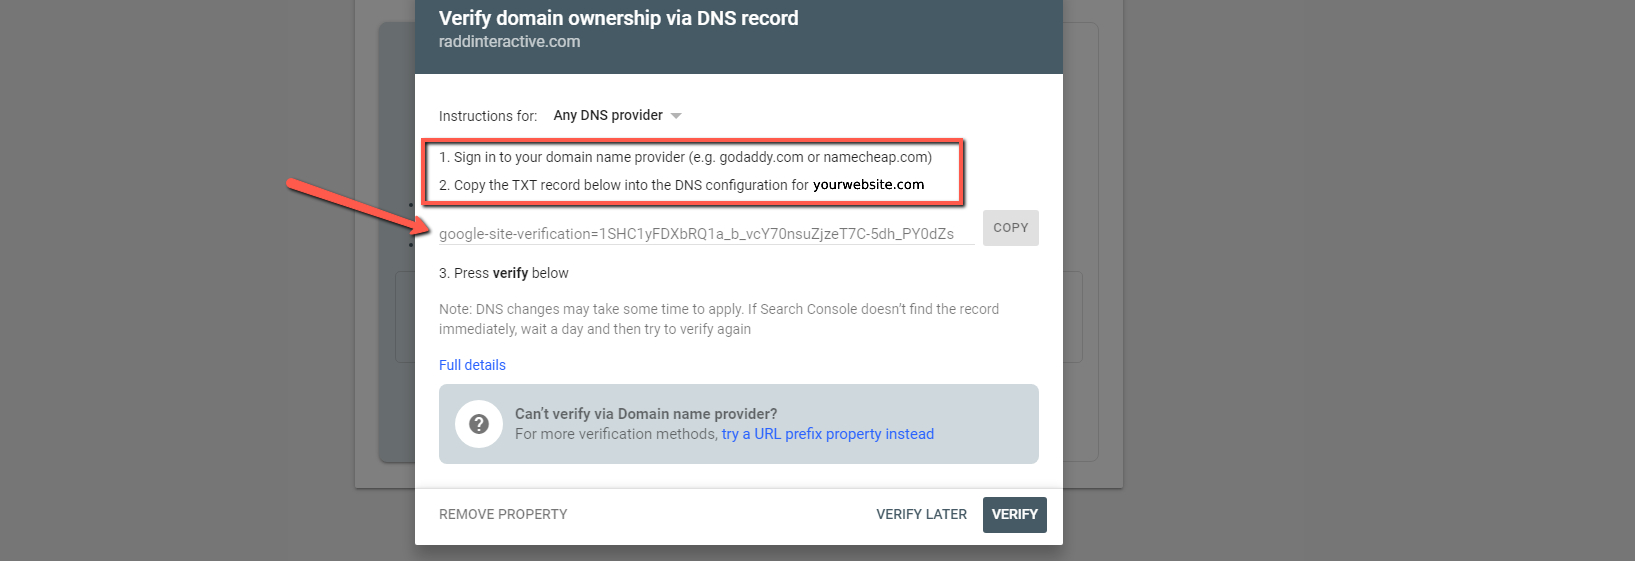
First, see if you can find your DNS provider in the dropdown. The DNS provider is the company you pay to use your domain such as GoDaddy, Google Domains, Dreamhost, Bluehost, etc.
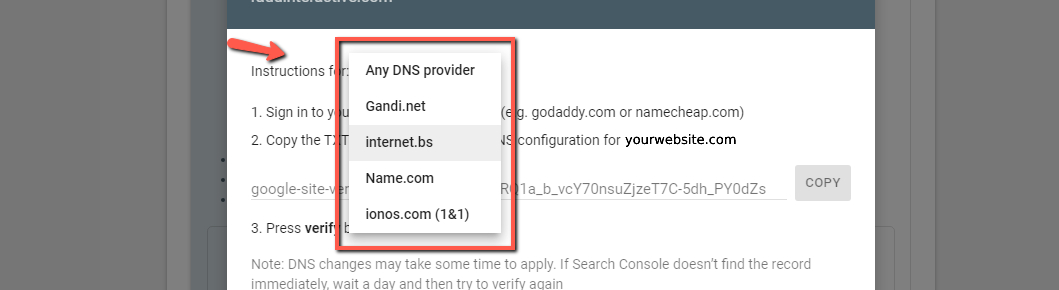
This will display detailed instructions specific to your provider. If you don’t see your provider, you can leave it as “Any DNS service provider.”
Next, hit the “Copy” button to copy the TXT record provided to you by Google.
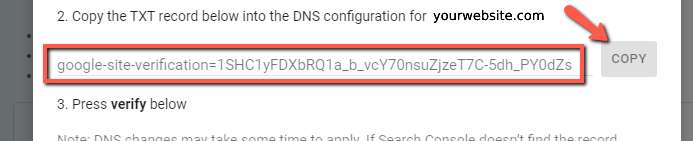
Once you’ve copied the TXT record, open your domain registrar’s site in a new tab and log into your account with them.
Navigate to the list of domains you own and select the one you wish to configure. Find the option to manage your DNS records. This will be located in different places, depending on your provider’s site, you will want to look for any mention of “DNS” and select it.
For example, on GoDaddy, you would go to “My Account > My Products” and select “DNS” next to your domain.
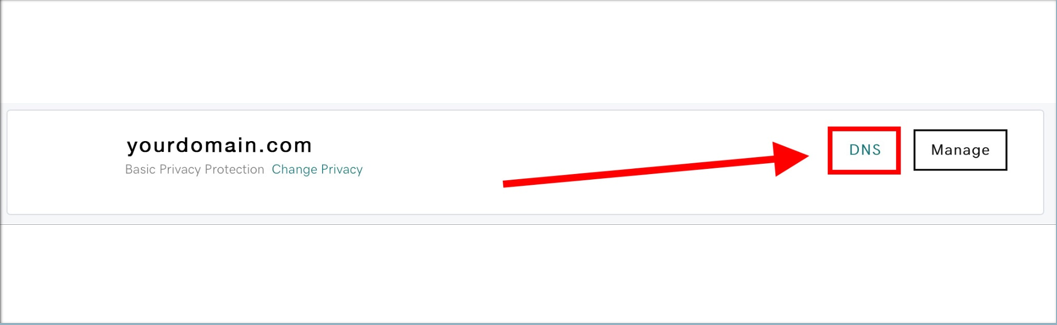
You’ll then be brought to a Domain Management screen where you’ll find a list of your DNS Records. Select “Add” to create a new one.
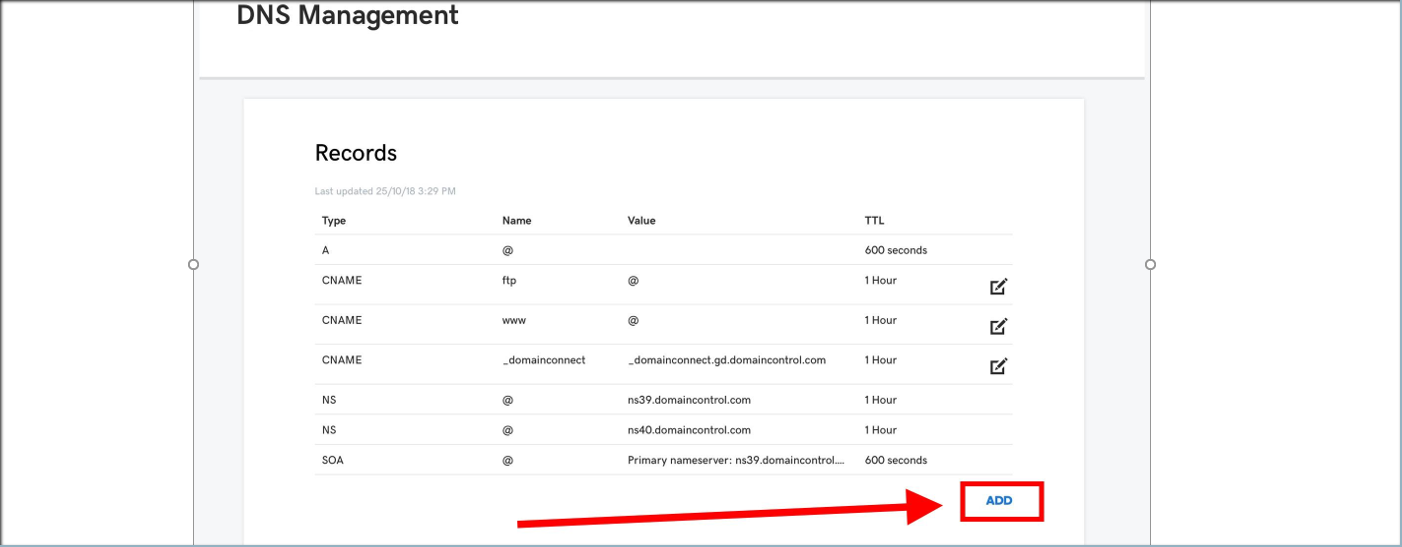
Select “Type” and choose TXT. Under “Host” type in the @ symbol. Leave “TTL” at 1 hour. And, most importantly, paste the TXT record you copied from Google into the field for “TXT Value.” Then click “Save.”
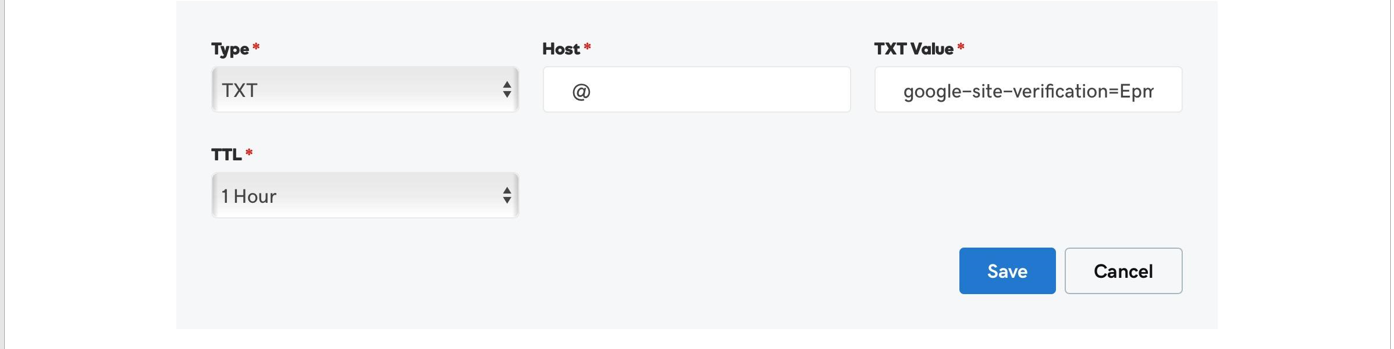
This will add a new TXT record for Google Search Console. (In case you’re wondering, a TXT record is used to provide info about your domain to an outside source — e.g. show Google you own a domain.)
The process we just outlined above for GoDaddy is very similar for all domain providers. You can even use the same entries for “Type,” “Hostname,” and “TTL.” Some providers will ask for “TXT Record” instead of “TXT Value.”
With your TXT record added, return to the Google Search Console set up and select “Verify.”
If everything went according to plan, you should see a message like this:
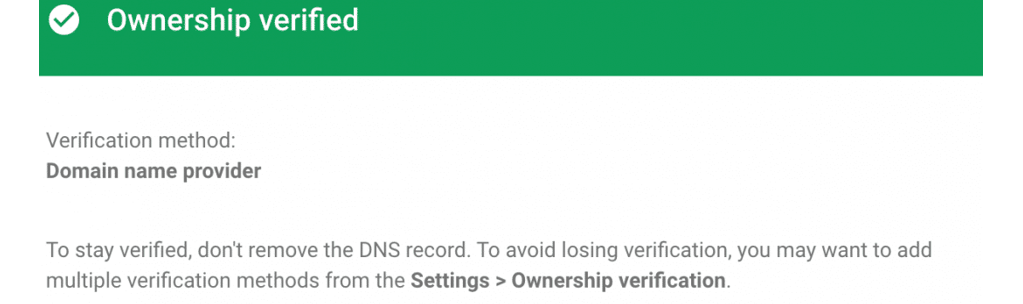
Please keep in mind that updating DNS records can take up to 72 hours. If your ownership isn’t verified immediately, come back in a few hours or the next day, and check again.
Verification for a URL Prefix Property
If you don’t have access to your domain registrar or would rather not touch your DNS records, you can set up Google Search Console using a URL Prefix property. This provides a number of alternative options for verification.

Google recommends verifying via an HTML file. (But remember, this is just for URL Prefix properties. Ultimately, they recommend you create a Domain property, if possible.)
**Note: You will notice that there is an option to verify via domain name provider. We explained how to do that above. If you’re considering using that method, you might as well create a domain-level property.
How to Verify via Other Methods for a URL Prefix Property
HTML File
For this method, you need to upload an HTML file to the root folder of your website. It’s easy to do, but the downside is you will need to have access to your server, either via FTP or a cPanel File Manager. If you’re not familiar with either don’t attempt to verify via this method.

If you are comfortable working with your site’s server, here’s how you verify using an HTML file:
- Download the file provided by Google. (By clicking the download box shown in the image above.)
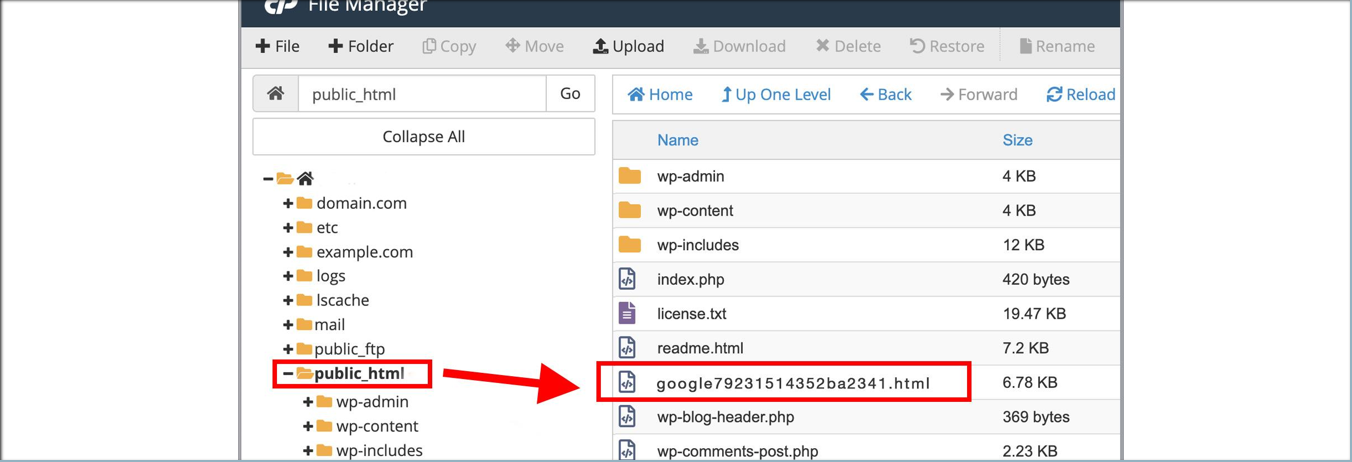
- Access the root directory (aka public_html) of your site.
- Upload the file. (Like the image example of how the file will appear shown below)
- Return to Search Console, and select “Verify
HTML Tag
To verify using the HTML tag you need to add a meta tag to your site’s <head> section. To do so you’ll need to have developer access to your site’s CMS. We’ll use WordPress as an example.
Using WordPress, there are two ways you can do this:
- Adding the meta tag directly to your header.php file
- Using a plugin to add to the header
More than likely you’ll go with option two. Because if you’re comfortable working with the header.php, you’re better off verifying via HTML file.
Here are the steps to add the GSC HTML tag to WordPress using a plugin:
- Copy the tag.
- Log into your site’s WordPress admin in a new tab.
- Install the Insert Headers and Footers plugin on your site.
- Go to Settings>Insert Headers and Footers.
- Past the Search Console meta tag in the “Scripts in Header” field.
- Return to Search Console, and select “Verify”
Google Analytics
If you have a Google Analytics account and installed a tracking code on your site, you can follow the steps for getting started with Google Search Console by verifying a User-prefix property. You will simply open up the Google Analytics verification box in Search Console as shown below.
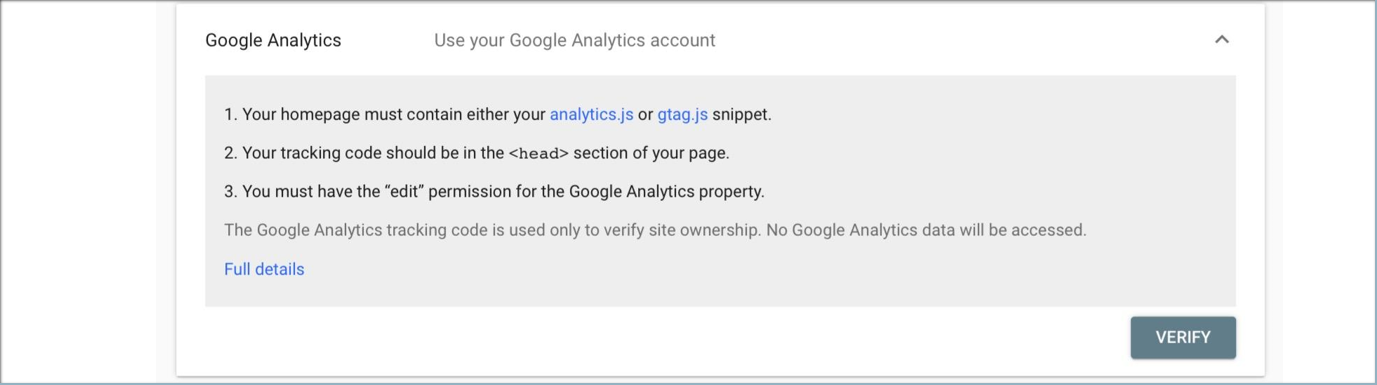
You will then click “Verify.”
For this to work, be sure you selected “edit” rights in Google Analytics for the item whose tracking code is being used by that property. If you haven’t yet added a Google Analytics tracking code — like analytics.js or gtag.js — to your site, you will need to do that first.
Google Tag Manager
Similar to the Google Analytics verification method, if you are already using Google Tag Manager, you can verify with a single click.
Open the Google Tag verification box in Google Search Console as shown below.
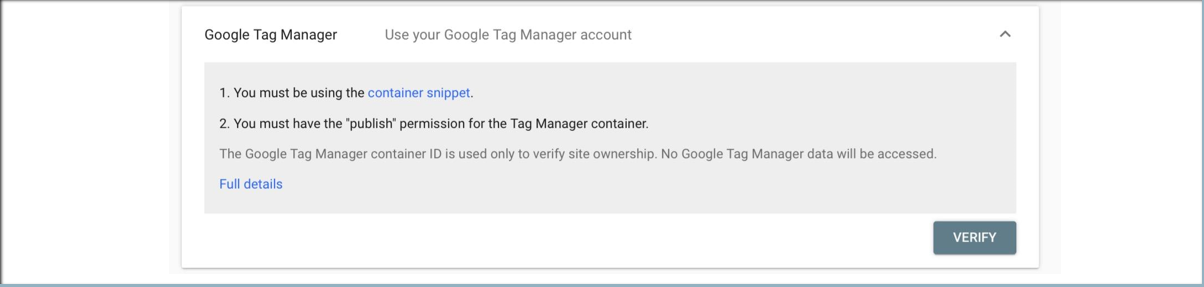
You will then click "Verify".
**Note: For this option to work, you need to have the Tag Manager snippet already installed on your site AND have permissions for Tag Manager set to “Publish.”
If you have any further questions related to Google Search Console, please take a look at their Support Page where they provide answers to many common questions.
Comments
0 comments
Please sign in to leave a comment.